To upload/delete documents you can do this from any patient profile.
Upload a Document
-
Search for a patient
-
Select the patient
-
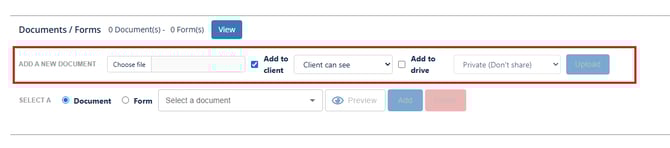
Under the section add a new document, click ‘choose file’ and select the file from your computer.
-
From this screen you can choose to add it to the client profile you are on with the check box ‘add to client’. You can also choose if the client can see the document or if it is just for you records with the drop down.
-
From the next check box ‘add to drive’ this will add the document to Wibbi’s database for use with other clients. In the next drop down you can choose to keep it private for only you as the user or share it for other users to use.
-
-
When done be sure to click upload.
Add an Already Uploaded Document to a Patient Profile
-
Open the Documents menu
-
Select a document (recent uploads appear at the top)
-
Preview if needed
-
Click Add to attach it to the client profile

Delete a Document
From a Patient Profile
-
Click View next to Documents
-
Find the document
-
Click X to remove it
From the Clinic Database
-
Go to the Documents section
-
Select the document
-
Click Delete
